Jump to content
SAU Community

Recommended Posts

Hi All,

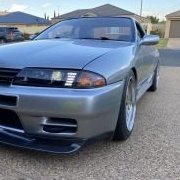
Been a while since i was on here and in a skyline, but im pleased to say that im now the proud owner of this R32 engineered with an RB25DET NEO and heaps of fruit!

Spec is as follows:-

Engine & Drivetrain:-

105,000km’s
Engineered 365kw Rb25det neo 
Set up with Boost by gear. As follows 
18psi 1st, 2nd and 25psi 3rd, 4th, 5th on e85
18psi on 98
Gtx 3076 .82r garrett with speedflow fittings and braided lines
ATP catch can with speedflow -10 braided lines and fittings
50mm gen V turbosmart external waste gate
Spitfire coils
Custom 3 inch dump into 4 inch HKS exhaust
ARP head studs 
Bosch 1250cc injectors 
Turbosmart fuel reg
Turbosmart fuel filter
Walbro 460l fuel pump with relay
Haltech elite 2500
49mm Koyo type r copper radiator 
Brand new Rb25 gearbox, exedy sports tuff HD clutch with upgraded pressure plate and one piece tailshaft
4.3 diff gears 1.5 way nismo diff

Interior:-

Haltech racepack street dash 
Aem oil pressure gauge
Aem wideband 
Turbo smart boost gauge on pillar 

Suspension & Handling:-

Cusco street zero adjustable coilovers
R33 Front lower control arms 
Adjustable castor rods

Exterior:-

Genuine N1 headlights 
Genuine GTR bonnet,
Genuine GTR front bar
Genuine GTR grill
Genuine 17x9 3 Piece BBS LMs wrapped in Hankook rs4s

ICE:-

Alpine Double DIN Headunit
Kicker Amp
Kicker 6x9's
Kicker Front Speakers c/w tweeters and crossovers

Current plans are:-

raise it up a little bit 10-15mm
remove some camber from the front,
buy some new rear tyres
wire up the wipers
carbon front lip (to replace the flaking stock one)
enjoy driving it!!


Now for the pictures!

IMG_5467.thumb.jpg.5a7804f035bcae31715eac2a0dbff4da.jpgIMG_5466.thumb.jpg.9d0208a0fc25dd8778fe51f07209a8cd.jpgIMG_5470.thumb.jpg.44cbff3d2e264a3307b786ba1e5447b2.jpgIMG_5461.thumb.jpg.28972758ed90935ef0a1e91228e18969.jpgIMG_5426.thumb.jpg.b76e40f0b75afbb0f4793eefb2191c2c.jpgIMG_5425.thumb.jpg.d8dddd384b338d39ed4901f15f86944f.jpgIMG_5420.jpg.824a798f4d158e3692656945659dad1d.jpgIMG_5468.thumb.jpg.82d9026481672937710d2973f055ab02.jpgIMG_5474.thumb.jpg.35edee158d92a8dc7bbc8409a59a5470.jpgIMG_5476.thumb.jpg.101dfd55b84756042f82d7773af60af0.jpgIMG_5441.thumb.jpg.0c74f306198e0c64c87565d81cdbde06.jpg

IMG_5471.jpg

  • Like 3
Link to comment
https://www.sau.com.au/forums/topic/480029-daymos-back-r32-rb25det-neo/
Share on other sites

Thanks, yes it was definitely well loved!

The previous owner put all the stickers all ver the car, i've removed most of them from the windscreen, i didnt actually know thats what the sticker meant on the ashtray, might leave it there now i know!

thanks! yeah as soon as  i saw it i just had to have it. it was basically what i dreamt i was going to do with my last one but without all the hassle and its already engineered! 


I'll definitely be in touch when it comes to ordering some new pads!

yeah theres just a few little bits that need finishing off.

The wipers are not wired in - i luckily have an old rb25 loom in my garage that i can unpick the plug from. but its still gonna be a bit of a task. and i absolutely despise wiring!

Also need to put the washer bottle back in once he sends me it. hopefully all that wiring is present.

Horn doesnt work either, again hopefully thats a simple fix. just want to make sure all these issues are fixed and keep it properly roadworthy.

Will need to make an enclosure for the pod filter too, thats the fun part though. means i can practice my welding skills on scrap stainless from work :)

Put the 3D printer to good use and printed this cup holder out of ABS. Gonna change the design a bit and get rid of the GTR logo and make the fit a bit smoother across the top. But it works for now!BD9F8CED-E4D3-48E4-894D-001FDBC871F2.thumb.jpeg.34c73a24dab8bac9f6bb378cb6125338.jpeg81FF9B4D-9A62-4801-879E-4C835B0F09F1.thumb.jpeg.86d27a8305b4e0778bb3d003ff2957dc.jpeg

Spent an hour or so unpicking 5-6 wires from an old rb25 wiring loom I had lying around. Tesa taped them up and found the connectors in the existing wiring loom and hooked them up. I now have working wipers! That’s one less thing to worry about come rego time!

Attempted to take the rear wiper off but the nut is all rusted out and corroded. Going to try and weld some scrap metal too it so that I can undo it and remove the whole motor assembly. Will use one of the blanking plugs from the boot floor so I’m not left with a hole in the glass.

Will 3D print some new bungs to fill the holes in the boot floor and stop water getting in.9F9B89EF-B2B2-4364-A7AA-4A6385168CB7.thumb.jpeg.a028aa2a22ef548f04cf1565e8ae2200.jpeg

DDB00E14-1FA3-49B6-B170-EB31DEAFE51F.jpeg

Edited by DaymoR32
  • Like 1
  • 2 weeks later...

Just a small update, did a little bit of tidying up to the car.

First thing on the list was removing the rear wiper as it didnt work at all (there's still a few little wiring gremlins with the car)

Before:

IMG_5515.thumb.jpg.ece5c84138a13aebf59f59054dbbe155.jpgAfter: (used a bung from the boot floor to fill the hole)

IMG_5575.thumb.jpg.5d6f9b9786e1a8b3ae2fd80f556d7dfe.jpg

Next up was installing some LED interior lights, found this pretty cool SMD PCB light which is actually super bright. makes the interior feel a bit more modern at night!

Before:-

IMG_5610.thumb.jpg.8abbd468623e465ba29420ec180c7876.jpg

After:

IMG_5611.thumb.jpg.7d440397eae54fcdad56088bfcc176a8.jpg

IMG_5612.thumb.jpg.522c7f2531e727b99fc59c806e700793.jpgIMG_5609.thumb.jpg.7e11dcc09117bbe6d8b7f2bdb3ebc0e7.jpg

Then installed a set of aero wipers on the front, got rid of the horrible metal ones:-

IMG_5613.thumb.jpg.2cb4600c90614f1d5e20ee31ade8a873.jpg

Next mod on the list is installing this when it gets delivered on Tuesday/Wednesday :)

IMG_5641.thumb.jpg.54744ba8703535973b346cd17214d159.jpgIMG_5640.thumb.jpg.7d19445811964532b001a1339ebda0df.jpg

I've also ordered some c-spanners from the UK, hopefully they will be here this week too. then i can raise the car a little bit, possibly get some wider rear tyres if they'll fit - on 235/45/17's at the moment, hoping a 245 may squeeze in once i raise the backend a bit. then i'll get a wheel alignment done. 

4 minutes ago, GTSBoy said:

It's kinda not surprising the rear wiper wasn't working. It was installed on the wrong side of the car!

Haha really? I prefer it without regardless, water just runs off the window anyway!

Carbon dmax roof spoiler arrived on Tuesday, went straight to burnings and got some sikafkex 258 - the automotive windscreen stuff. Cleaned the window and the spoiler with isopropyl alcohol and applied a decent amount of sikafkex to the spoiler.

DC51DB76-4FC7-4747-91A0-D7A124FFA44A.thumb.jpeg.b7d61855028d1f2c99fafeda50fee0b5.jpeg 

then chucked a ratchet strap over it and placed a bit of weight on top for extra pressure...

83ED5ECD-6ED5-4CD7-8047-81D920BBA075.thumb.jpeg.c31c9f6d3868d539ce17352ea4d5073c.jpeg
 

Left it to set for 12 hours overnight and it’s safe to say she’s on there for good now! I only have garage photos for now but I’m happy with the look

D43DBB72-F7D1-467C-93BD-4E9F2AA8D283.thumb.jpeg.eeb46781082c7321ee16d8f7bd8a9c23.jpeg9A271BEE-BBFF-41CD-87C8-23754F4A21EB.thumb.jpeg.c0530295b77c0f1a70ad4daed067498f.jpeg73C21AFD-A9CF-42D4-AF5A-3B1D018C2F34.thumb.jpeg.dfca3126c5e21f9dd3480274cf589880.jpeg09F23E84-132B-42A5-B1A7-A8D40D5306C8.thumb.jpeg.2a51c7d6eebdcd0411b42c8a7eb5052e.jpeg

Also had a GTR seat laying around in the garage for a couple of years, thought I’d chuck it in to see how it feels (it’s not in the best condition though). Much happier with the driving position as I’m now sat a bit lower. Now I just need to hunt down a passenger seat and rear bench!C0BC6D7F-74A1-4339-AE33-861E09BA044B.thumb.jpeg.3412ff457ecb574b25a72dff1ee5f5a4.jpeg

  • Like 1
  • 2 weeks later...

My c spanner’s finally arrived on Friday which meant I could raise the car up 15mm all around, however more importantly my carbon jun style front splitter arrived! Again, I’ve only got garage pics for now but it makes the front look heaps better and gets rid of the paint damage on the oem splitter!

49D19C95-87DE-4F36-9907-2A1AE91907EE.thumb.jpeg.2dc4a685bb397dde69094a3837e9126e.jpeg0772E6A9-D8CD-4A5F-8B92-F7F7D706CEB1.thumb.jpeg.07185cd105bb87cb5148826bf6ebec8f.jpegEB70C29A-2BD3-42B1-88DF-0869C201204E.thumb.jpeg.af385808157d1451895ecce9de79827a.jpeg

ive also ordered some replacement ancillary belts as they are starting to squeak on startup, hopefully they arrive this week.

  • Like 1
  • 2 weeks later...

Create an account or sign in to comment

You need to be a member in order to leave a comment

Create an account

Sign up for a new account in our community. It's easy!

Register a new account

Sign in

Already have an account? Sign in here.

Sign In Now


  • Similar Content

  • Latest Posts

    • To expand on this to help understanding... The bigger/longer the block is, the more it's going to work to sit on your far away high areas, and not touch the low stuff in the middle. When you throw the guide coat, and give it a quick go with a big block, guide coat will disappear in the high spots. If those high spots are in the correct position where the panel should be, stop sanding, and fill the low spots. However, using a small block, you "fall off" one of the high spots, and now your sanding the "side of the hill". Your little block would have been great for the stone chips, where you only use a very small amount of filler, so you're sanding and area let's say the size of a 5/10cent piece, with something that is 75*150. For the big panel, go bigger!   And now I'll go back to my "body work sucks, it takes too much patience, and I don't have it" PS, I thought your picture with coloured circles was an ultra sound... That's after my brain thought you were trying to make a dick and balls drawing...
    • Oh I probably didn't speak enough about the small sanding block for blocking large areas.  In the video about 3 minutes in, he talks about creating valleys in the panel. This is the issue with using a small sanding block for a large area, it's way too easy to create the valleys he is talking about. With a large block its much easier to create a nice flat surface.  Hard to explain but in practice you'll notice the difference straight away using the large block. 
    • Yep I guessed as much. You'll find life much easier with a large block something like this -  https://wholesalepaint.com.au/products/dura-block-long-hook-loop-sanding-block-100-eva-rubber-af4437 This is a good demo video of something like this in use -    You have turned your small rock chip holes into large low spots. You'll need to fill and block these low spots.  It's always a little hard not seeing it in person, but yes I would go ahead and lay filler over the whole area. Have a good look at the video I linked, it's a very good example of all the things you're doing. They went to bare metal, they are using guide coat, they are doing a skim coat with the filler and blocking it back. If what you're doing doesn't look like what they are doing, that's a big hint for you  
    • The odometer does go up when driving.  Does this tell it is an issue with the speedometer itself?    Where can I look for replacement cluster? Or speedo? I can likely do the repair.. Will ER34 cluster work on HR34? Or do I need a HR34 20GT S2 specifically lol   
    • Mine's a bit bigger at 70x150mm roughly. The spots are flat, just can feel the edges if I dig my nail into it. I did fix some other other ones by both using my finger to sand that small spot (I'm a bit wary of doing this and creating hot spots and a bigger mess) and I also did sand over it flat and others, but this also worried me a bit because if I create an overall low spot on the panel on paint that is good.  Correct me if I'm wrong but as long as it's flat even if I can feel the edges, I can put filler because it will all be level once I sand it? I can see myself going in a circle after sanding guidecoat with 320 grit if for example the panel is flat with my hand but because I sanded the guidecoat I could have created a low spot again somewhere. Unless where I'm going wrong is what I mentioned previously where I didn't go low enough on the grits. It's 1 step forward and 2 step backwards here haha. I'll probably need to experiment with it more. Last time I go back to bare metal lol.
×
×
  • Create New...