VSPECT Posted November 18, 2010 Share Posted November 18, 2010 not only that dan you need to change your signature too...lol...change to the R.. Link to comment https://www.sau.com.au/forums/topic/344597-goodbye-my-gtt-and-welcome/page/3/#findComment-5555420 Share on other sites More sharing options...
Beer Baron Posted November 18, 2010 Share Posted November 18, 2010 nope, for sale - was going to put a bunch of JSAI stuff on but i was happy with how the car looked when it arrived, so they're up for sale good choice mate. you know my thoughts, the car looks wonderful as is. It's very special and there will never be another one like it considering it's a genuine NUR, with 1 owner since new, with very few kms but mega $$$ in quality parts all fitted and tuned at Midori Seibi. Link to comment https://www.sau.com.au/forums/topic/344597-goodbye-my-gtt-and-welcome/page/3/#findComment-5555483 Share on other sites More sharing options...
Zaver Posted November 18, 2010 Share Posted November 18, 2010 Congrats on the Car Buddy... Looks HAWT!!!! Link to comment https://www.sau.com.au/forums/topic/344597-goodbye-my-gtt-and-welcome/page/3/#findComment-5555782 Share on other sites More sharing options...
PM-R33 Posted November 18, 2010 Share Posted November 18, 2010 Very nice man! Gorgeous and a great stack of mods. I was wondering what you would get after the GTT Link to comment https://www.sau.com.au/forums/topic/344597-goodbye-my-gtt-and-welcome/page/3/#findComment-5555799 Share on other sites More sharing options...
Harey Posted November 18, 2010 Share Posted November 18, 2010 I am speechless, what a car!! Well Done! Link to comment https://www.sau.com.au/forums/topic/344597-goodbye-my-gtt-and-welcome/page/3/#findComment-5555810 Share on other sites More sharing options...
NickR33 Posted November 18, 2010 Share Posted November 18, 2010 there are not too many cars that can sit next to mine and actually make me feel like i hate my car.... but yours managed to do it!i was parked next to an f430 the other day and didn't think anything of it, but then at the show and shine i was seriously envious! I made the mistake of parking next to a R35 at the golf course... my car has never looked so shit... I thought it would be cool to have them parked next to each other... it wasn't and I was glad it was gone when I came back! lovely Nur... colour and wheel choice spot on, congrats Link to comment https://www.sau.com.au/forums/topic/344597-goodbye-my-gtt-and-welcome/page/3/#findComment-5555829 Share on other sites More sharing options...
maclarenf1 Posted November 18, 2010 Share Posted November 18, 2010 Nice Car Mate NUR .. it's about as special as it gets with all the goodies in the world already done up as well.............. you know what post some pics of the new car on PerformanceForums.com , remember you getting a lot of shit for the GTT sale tread, if my memory is correct Link to comment https://www.sau.com.au/forums/topic/344597-goodbye-my-gtt-and-welcome/page/3/#findComment-5555879 Share on other sites More sharing options...
llama_au Posted November 18, 2010 Share Posted November 18, 2010 Must have missed you Juliette... went to work around 1:15pm and only came back to move the car out... I wasn't there that long. Just popped in for a sticky beak around that time after Yum Cha Link to comment https://www.sau.com.au/forums/topic/344597-goodbye-my-gtt-and-welcome/page/3/#findComment-5555949 Share on other sites More sharing options...
Ante34WPN Posted November 18, 2010 Share Posted November 18, 2010 Congrats Dan. Another fine Example you have Link to comment https://www.sau.com.au/forums/topic/344597-goodbye-my-gtt-and-welcome/page/3/#findComment-5556308 Share on other sites More sharing options...
omega36 Posted November 18, 2010 Share Posted November 18, 2010 AWESOME! Nice buy dude!!! Link to comment https://www.sau.com.au/forums/topic/344597-goodbye-my-gtt-and-welcome/page/3/#findComment-5556358 Share on other sites More sharing options...
eMsta Posted November 18, 2010 Share Posted November 18, 2010 holy moly! 2 great cars!!! how much did that nur set u back!!!! Link to comment https://www.sau.com.au/forums/topic/344597-goodbye-my-gtt-and-welcome/page/3/#findComment-5556584 Share on other sites More sharing options...
joeyjoejoejuniorshabadoo Posted November 18, 2010 Share Posted November 18, 2010 more than $5 Link to comment https://www.sau.com.au/forums/topic/344597-goodbye-my-gtt-and-welcome/page/3/#findComment-5556675 Share on other sites More sharing options...
scotty014 Posted November 18, 2010 Share Posted November 18, 2010 Thanks heaps for the comments guys! Mucho appreciated Must have missed you Juliette... went to work around 1:15pm and only came back to move the car out... for the GTT owners, now that i've been lucky enough to have driven both the TT and R, don't underestimate your cars. There was a little period where i had both the R and GTT and it was nice to hope back into Blackie. Great gearboxes (especially if you have the datsun clubs 'dildo' variety shifter ), definitely more responsive than the 26 and just an all around more 'streetable' car. Maybe my R isn't a fair comparison but in an ideal world i would get around in the GTT for most duties, and the R would be kept for the serious stuff They are great cars, with great potential, and now that the new Garret GTX series turbo's are out with greater E85 availability..... fun times indeed that's really the same for any of the rwd 25's. I've come to appreciate them a lot more after driving around in the R for the last little while. i'll get up the gratuitous full sun detailing shots soon mine was different, it shits all over my old gtt lol. but yours was making some good power to begin with. what do you think of the gtr gearbox? more than $5 and less than 2 million : P Link to comment https://www.sau.com.au/forums/topic/344597-goodbye-my-gtt-and-welcome/page/3/#findComment-5556691 Share on other sites More sharing options...
VSPECT Posted November 18, 2010 Share Posted November 18, 2010 srz? thought it was only $2 for the joy ride.....lol..still not over what happened at the show n shine...the random sitting in the car...lol... Link to comment https://www.sau.com.au/forums/topic/344597-goodbye-my-gtt-and-welcome/page/3/#findComment-5556707 Share on other sites More sharing options...
Mohsen Posted November 18, 2010 Share Posted November 18, 2010 (edited) srz? thought it was only $2 for the joy ride.....lol..still not over what happened at the show n shine...the random sitting in the car...lol... LOLL WHAT? Congratulations Daniel! looks awesome! Edited November 18, 2010 by Mohsen Link to comment https://www.sau.com.au/forums/topic/344597-goodbye-my-gtt-and-welcome/page/3/#findComment-5556813 Share on other sites More sharing options...
Birds Posted November 18, 2010 Share Posted November 18, 2010 Still not over that Dairy Bell "nuts about chocolate", reminded me of how much I love that flavour. Link to comment https://www.sau.com.au/forums/topic/344597-goodbye-my-gtt-and-welcome/page/3/#findComment-5556814 Share on other sites More sharing options...
Beer Baron Posted November 19, 2010 Share Posted November 19, 2010 I am still not over the fact that when I first tried to buy this car for daniel it was 100% sold. and only after pleading and rapid calls to japan and promises of rapid purchase did they 'un-sell' it for us and disappoint some poor japanese buyer! you are lucky man daniel-san! same thing happened to me in reverse not long after on a car I was told was mine and was then sold form under me. still you are one lucky mo-fo and it's such a beautiful car and special in so many ways. Link to comment https://www.sau.com.au/forums/topic/344597-goodbye-my-gtt-and-welcome/page/3/#findComment-5557386 Share on other sites More sharing options...
SS8_Gohan Posted November 19, 2010 Author Share Posted November 19, 2010 your case was mega bad luck, you were in if it weren't for some other plebs in the business doing deals without the big man knowing it seems and yes, there was severe disappointed at one stage when it seemed this car was gone, but ze Baron persisted! we also have ze Baron to thank for getting this beautiful car to Australia. The man knows how to import cars oils ain't oils and importing ain't importing - muchos gracias senior Baron, may Rex Banner never find you Link to comment https://www.sau.com.au/forums/topic/344597-goodbye-my-gtt-and-welcome/page/3/#findComment-5557420 Share on other sites More sharing options...
Birds Posted November 19, 2010 Share Posted November 19, 2010 Dammit, I could only find the Spanish version Link to comment https://www.sau.com.au/forums/topic/344597-goodbye-my-gtt-and-welcome/page/3/#findComment-5557475 Share on other sites More sharing options...
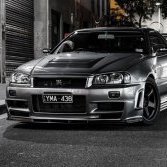
tangomatt Posted November 19, 2010 Share Posted November 19, 2010 Beautiful NUR Daniel! I had been wondering when you would get hold of your dream BNR34. The mods are certainly top shelf stuff! I like those Alcons in particular and all the suspension tuning. Let's not mention the HKS 2530s. However, I wonder whether your loud exhaust and all those highly conspicuous under the bonnet mods would eventually attract the wrong police attention.... Also how the hell did The Baron get this car complied with all those mods!!!!! When I imported mine, the compliancer had to even remove the Xenons to get compliance. Had I known I would have imported a Mines car or something like that from say Global GTR from the very beginning. I am sure if if youe were to buy all those individual items that are now on your car, it would add up very easily to 50-60k in parts alone. Bargain if you paid a reasonable price for your car!! Should definitely catch up. I would love to check out your car in person. Dammit I missed the Show and Shine! Cheers Matt Link to comment https://www.sau.com.au/forums/topic/344597-goodbye-my-gtt-and-welcome/page/3/#findComment-5557735 Share on other sites More sharing options...


Recommended Posts
Create an account or sign in to comment
You need to be a member in order to leave a comment
Create an account
Sign up for a new account in our community. It's easy!
Register a new accountSign in
Already have an account? Sign in here.
Sign In Now