Jump to content
SAU Community

Recommended Posts

Hey guys,

Just a quick update... Diff has just returned from DIFFTRANS and i was more than happy with their work, they ripped apart the 2nd hand Nismo 2 way i bought and found it was setup with no backlash and had a few issues with the setup but in terms of condition it was pretty shmick!

DIFFTRANS rotated the housings and set it up as a 1.5way, carried out the proper setup and sealed it all up... Then painted it black and added some decent oil... I highly recommend their work if you are chasing any gearbox or diff work and want good genuine service, Aaron even ran through the process with parts he had laying around so i knew what had been done.

DIFFTRANS 02 4961 1000 located near Newcastle :thumbsup:

post-47580-0-05227500-1311053161_thumb.jpg

Next job is to tackle the braided HEL lines which is an easy enough job but i haven't decided which brake fluid to use, suggestions and suppliers? :huh:

Did he tell you how he changed it from a 2 way to a 1.5? The two diffs are very different internally, the only adjustment I can think off is a soft med and hard setting behind the left hand shaft.

The build looks great shame to loose the cage and seat as they look shmick. I live hunter valley also we might have to catch up when it is done, I am keen to see yours too Dave it is going to be a ripper.

Congrats on build so far.

Hey Ryan,

Yeah the Nismo Pro and Cusco diffs can have the housings rotated to set them at 1 way, 1.5 way or 2 way... It is a combination of ramps that makes the diff what it is... I only learned this after buying it and researching it a little, if you Google it you can find plenty of info. The Nismo Pro TT is the one that can have adjustments through the half shaft but mine is the model back from that.

Did you update your build Dave?

PS - i purchased a radiator air deflector thingo, the laser cut alloy plate which will completely hide my cooler setup :worship:

Cool I must have always used pro TT's thanks for the info.

Nah been lazy,

So I'm just hijacking your thread!

I'll get onto it this week, Ryan was curious about my bonnet fitment anyhow.

Haha.... Well my thread is about to take a disappointing turn in the wrong direction....

Unfortunately, due to the car taking forever because of funds from bad real estate choices and the current place i purchased i am going to have to cut the build short >_<

This is good news for R34 owners as the Cage, Recaro and Harnesses will be up for sale along with the TRUST/GREDDY oil cooler and oil filter relocation kit, these parts are either new or near new and it will be a sad day to see them go, the money from the sale will buy the Haltech PS2000 and will see the cars first start up with all the new gear fitted, i will re-purchase the items i sell at a later date, but it has to be done :/

Bugger, that sucks Matt sorry to hear it. I am fortunate enough to have a switched on wife who made me buy a house many years ago so I've been lucky with the mods not eating into the mortgage.

I might send you a pm about the oil cooler kit, does it have a thermostat?

  • 4 weeks later...

Hey Guys,

Time for a quick update...

As mentioned, financial crap has set me back a long way with about $6000 in bills coming up early DEC which was to be used to finish the car but now is going to them plicks at the government.... :rant:

ANYWAY, back to the story, i will selling the following from the car to complete the basics -

ROLL CAGE - BROWN DAVIS

2 x 5PT DRIFT HARNESSES

RECARO SR3 + BRIDE RAIL

52mm ALLOY RADIATOR + SILICON HOSES (new)

GREDDY PROFEC B SPEC II - NEW

HEL BRAIDED BRAKE LINES - NEW

This is part of the plan to pay for the ECU so i can get the car back on the street, the interior will get a clean and return to stock for a while and the car will run with Plumb black gate and BOV until i work out an Engineer Certificate... I will also be running the pipework just painted black for now until i can afford to do it all properly in Satin black, it looks average but once i swap back to the stock radiator and hoses and change a few bits and complete the airbox it will be all black and semi clean for now.... The cooler and piping is all stealth, the black BOV is hidden in the guard and the Alloy radiator air deflector hides the top of the cooler.... Its stock Officer i swear!!! :ph34r:

Pics of progress -

post-47580-0-68567500-1322016686_thumb.jpg post-47580-0-10411200-1322016754_thumb.jpg post-47580-0-00025000-1322016860_thumb.jpg post-47580-0-35974900-1322016933_thumb.jpg post-47580-0-51749100-1322017067_thumb.jpg post-47580-0-62057000-1322017153_thumb.jpg

Battery will remain in factory location too.

Not the direction i wanted to go, but i can always buy back performance gear at a later date, getting this house is a positive step in the right direction, just losing $40K on the last property hurt and killed most plans for track time :glare:

Any thoughts or comments just lemme know... Thanks...

  • 1 month later...

Well, although f**k all has been happening with the car due to a bad experience with Blacktrack Performance and the $$ situation, i have removed the alloy rad and blue hoses and gone back to stock items as it suits the build much better, i had the 52mm rad in but it caused the engine fan to hit the shroud and i had no intention of going too a thermo setup.

post-47580-0-94799100-1326686949_thumb.jpg

As you can see when you step back from the car the engine bay has no BLING, so it does not look out of place..... Btw the cooler pipes will be hidden too, but someone butchered and f**ked my front bar...... (PS - sorry about the volkswagon ruining the image on this site, i know its blasphemy LOL)

post-47580-0-16511300-1326687123_thumb.jpg

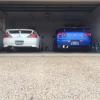
You can see the car hiding in the shed, buying the property has slowed my build right down so i figured i would include it in the build thread as its all been a part of the long and slow process

post-47580-0-43332300-1326687244_thumb.jpg

So, basically its back to the standard interior next and then finish the brake lines and suspension, i might get some pics of the brake line change etc if i get the time....

Hey mate just curious how does the porche drive compared to the gtt? Nice build btw!

Nice cruiser but other than that its got nothing on the GTT.... Its only a 996 non turbo tiptronic so its nothing special, and NO it is not mine LOL....

Oh, and thanks :thumbsup:

  • 2 weeks later...

Come on Matt, stop messing about and get it tuned already, I want results! laugh.gif

Seriously though, I'm watching this space thumbsup.gif You've got me tempted to start my own build thread, but my god it's come a long way... I don't know if there are enough hours in a day.

  • 2 weeks later...

Come on Matt, stop messing about and get it tuned already, I want results! laugh.gif

Seriously though, I'm watching this space thumbsup.gif You've got me tempted to start my own build thread, but my god it's come a long way... I don't know if there are enough hours in a day.

Hey Mate,

It was all on track until i decided to buy a house :( BUT things are looking OK at the moment and i will have some updates soon......

You should start a thread!!! But they do take time, hence why mine has been neglected and untouched for so long...

I have been tempted to put the top NEO cover back on the car as i can probably make it fit, will it ruin the theme or will it enhance the stealth look? So far 2 mates have said DON'T do it -

post-47580-0-48978500-1329273937_thumb.jpg

I slapped it on top while i was actually taking a pic of it so i could sell it, made me laugh at first and then i though it really would look stocky.... The other addition i want to add is the snorkal back into a custom airbox but i need to borrow one to trial fit, anyone help out with lending me one to see if it will work?

Voting no on the engine cover, would be a shame to cover up Chris' work like that. Have always thought the Neo motor looked poxy with that cover though...

Well that's 3 for 3 so looks like a no go.... :cool:

On another note, i will have a JJ alloy airbox to chop and modify to see if i can make it fit around the piping (Thanks to Bronx on this forum... Champion :thanks:) I will post up pics if the fitment before and after....

Also, pretty keen on ordering a turbo blanket/Beanie from the US as the quality looks good and they are much cheaper than the locally supplied items which look to be exactly the same thing, i have read good and bad things about them so will just bite the bullet and see how they go.

I reckon the NEO cover wont like being that close to the turbo anyways...

What supplier are you looking at for the beanie?

Probably not mate, i have seen a pic of another one online with it fitted but not sure how long it'd last.....

As for the Turbo Beanie, Rotormaster have a new one coming into stock which is apparently made from a dimpled alloy material but is shaped and flexible like the beanie, this would be an interesting design but i would need to heat paint them black so it suits the engine bay.... If that design is a no go i am strongly considering PTP Turbo Blankets in the US as they have an all black design that is about $120 delivered, probably cheaper if you want to order one as i assume it would share the freight cost?

http://www.ptpturboblankets.com/index.shtml

Rotormaster explained why some of the blankets fail due to the stitching not being rated the same as the actual bag material, apparently the failures are due to incorrect fitment, but i dont know as i have not had any experience with them.

  • 1 month later...

Motivation has been restored and mods are getting done again, here a few updates -

New oil cap (Not necessary but couldnt help myself - post-47580-0-47166900-1332914109_thumb.jpg

New boost controller, decided to sell the GREDDY - post-47580-0-43081600-1332914151_thumb.jpg

Turbo Blanket, not sure if it will work properly but really hope it does - post-47580-0-48236900-1332914270_thumb.jpg

Airbox modification, purchased this from Bronx here on SAU and carried out a LOT of modifcation to make it fit -

post-47580-0-63779600-1332914336_thumb.jpg post-47580-0-04242300-1332914360_thumb.jpg post-47580-0-71467900-1332914377_thumb.jpg

I am now finally at the ECU stage as the thing is ready to run... I have had help from some very genuine members on this forum which has really helped and also motivated me to get this finished so i can finally do what the car was built to do.....

I will have regular updates over the next few weeks with progress.

Next on the list, Craved Coatings for the wheels :banana:

Still keen on BLACK unless someone can advise otherwise... Gunmetal was second option but if i dont like the black then i guess i can go to 9.5 all round...

Cheers

Mat

Create an account or sign in to comment

You need to be a member in order to leave a comment

Create an account

Sign up for a new account in our community. It's easy!

Register a new account

Sign in

Already have an account? Sign in here.

Sign In Now


  • Similar Content

  • Latest Posts

    • Have a look at that (shitty) pic I posted. You can see AN -4 braided line coming to a -4 to 1/8 BSPT adapter, into a 1/8 BSPT T piece. The Haltech pressure sender is screwed into the long arm of the sender and factory sender (pre your pic) into the T side. You can also see the cable tie holding the whole contraption in place. Is it better than mounting the sender direct to your engine fitting......yes because it removes that vibration as the engine revs out 50 times every lap and that factory sender is pretty big. Is it necessary for you......well I've got no idea, I just don't like something important failing twice so over-engineer it to the moon!
    • Yup. You can get creative and make a sort of "bracket" with cable ties. Put 2 around the sender with a third passing underneath them strapped down against the sender. Then that third one is able to be passed through some hole at right angles to the orientation of the sender. Or some variation on the theme. Yes.... ummm, with caveats? I mean, the sender is BSP and you would likely have AN stuff on the hose, so yes, there would be the adapter you mention. But the block end will either be 1/8 NPT if that thread is still OK in there, or you can drill and tap it out to 1/4 BSP or NPT and use appropriate adapter there. As it stands, your mention of 1/8 BSPT male seems... wrong for the 1/8 NPT female it has to go into. The hose will be better, because even with the bush, the mass of the sender will be "hanging" off a hard threaded connection and will add some stress/strain to that. It might fail in the future. The hose eliminates almost all such risk - but adds in several more threaded connections to leak from! It really should be tapered, but it looks very long in that photo with no taper visible. If you have it in hand you should be able to see if it tapered or not. There technically is no possibility of a mechanical seal with a parallel male in a parallel female, so it is hard to believe that it is parallel male, but weirder things have happened. Maybe it's meant to seat on some surface when screwed in on the original installation? Anyway, at that thread size, parallel in parallel, with tape and goop, will seal just fine.
    • How do you propose I cable tie this: To something securely? Is it really just a case of finding a couple of holes and ziptying it there so it never goes flying or starts dangling around, more or less? Then run a 1/8 BSP Female to [hose adapter of choice?/AN?] and then the opposing fitting at the bush-into-oil-block end? being the hose-into-realistically likely a 1/8 BSPT male) Is this going to provide any real benefit over using a stainless/steel 1/4 to 1/8 BSPT reducing bush? I am making the assumption the OEM sender is BSPT not BSPP/BSP
    • I fashioned a ramp out of a couple of pieces of 140x35 lumber, to get the bumper up slightly, and then one of these is what I use
    • I wouldn't worry about dissimilar metal corrosion, should you just buy/make a steel replacement. There will be thread tape and sealant compound between the metals. The few little spots where they touch each other will be deep inside the joint, unable to get wet. And the alloy block is much much larger than a small steel fitting, so there is plenty of "sacrificial" capacity there. Any bush you put in there will be dissimilar anyway. Either steel or brass. Maybe stainless. All of them are different to the other parts in the chain. But what I said above still applies.
×
×
  • Create New...