Search the Community
Showing results for tags 'mod'.
Found 6 results
-
 For sale I have my 2002 Mitsubishi Evolution 7 GTA. The car has 84***kms. The car has the following mods/features: Carbon Fibre Bonnet Coilovers Black Tail Lights Exhaust K&N air filter Walbro Fuel Pump GFB (go fast bits) fully adjustable BOV GFB electronic boost controller Carbon Wrapped interior parts Rare Black Leather Interior Auto (can put into tiptronic and shift via buttons on wheel or gear stick) Tuned by Ben at Benchmark. Has 2 tunes saved on Boost controller Low (14psi) and High (22psi) And much more... I have loved this car and it is a quick car with some get up and go and handles like a dream. Also comfortable enough with the leather interior and practical being 4 door. Have owned V35 , Soarer , Legnum in past and this is by far the quickest car out of the lot. I am chasing: $14 500 ono Car is located in Newcastle NSW Please txt me on: 0404 519 365 Or email on: [email protected] I will consider swaps for the following cars : V35 , Aristo , Stagea , LS400 , Celsior , E38 , R32 GTST (Pretty much any luxury cruiser) (R32GTST is because I have someone who wants to trade an aristo for one for all the potential trolls)
 -
R34 Auto Off headlights Hello, So today i modded my headlights to they turn off automatically when the key is removed from the car. I am doing this on my 1998 R34 25gt. It should be the same for the gtt at least, and somewhat similar for other models. This will make sure you cant leave your headlights on when you park only to return to a flat battery. (I've done this 3 times now) Tools: Soldering iron, Wire cutters, wire strippers, pliers, Crimper (i just used my pliers) Supplies: Solder, 3 horn relays. (i used jaycar part SY4068) at least 12 connectors to put on the relay tab (you need 12, but the packs from jaycar come in 8 packs.) couple of meters of wire Heat shrink First you will have to remove the plastic surround that goes around the steering column. There are 3 screws underneath. undo these and pull down on the handle that adjusts the wheel height, with this done it should just pop off. once this is done you will need to remove the lower dash piece. On mine there is a screw on the left and a couple of bolts on the right next to the bonnet release. you should now be able to pull it off, making sure to disconnect any plugs that are on the panel. there will be a bundle of wire coming from just behind the wheel under the dash then back up under the dash, In mine it was already cut open so this is where i attached my relays. you will need to find the correct wires that control the head lights. In my case it was the RED/WHITE wire, RED/YELLOW wire and the RED/BLUE But you should check these are correct. Best way i found is to look on the back on the indicator stalk there are 2 plugs, one has about 12 connectors on it, the other has 4. The connector with 4 plugs should have the wires said above and a green/white one. (Again your mileage may vary) Where ever you decide to splice into these wires you might want to cut the wire and extend it about 10cm on each side of the cut so you have a bit more room to work with. I soldered my little extension on the cut wire and heat shrunk it up. With this done i crimped the connectors onto the end of my wire and connected these to pins 87 and 30 of each relay. Now to get some power to toggle the relays. you will need some that is only powered with the key in the ignition. I got mine from the 12v socket next to the shifter. Connect a length of wire to the pos and neg of this and run it to under that dash (There might be a better spot to get this from, but i couldn't think of anywhere) then you will have to split this between the 3 relays. you can do this how ever you want. it should be pretty straight forward. crimp your connectors onto these wires and plug them on the remaining relay plugs. When moving the key to ACC you should be able to head the relays clicking. if not check your getting 12V on the connectors and that they are plugged in to the correct pins. it should be pins 85 and 86. Check that the lights all turn on with the key in the ignition. remove the key and the lights should go off with that.
- 2 replies
-
- 2
-

-
- headlights
- auto off
- (and 11 more)
-
Disclaimer: There's a lot of people recommending to do this mod, but I haven't seen any idiotproof guides on how to do it. I'm not saying this is the best way to do this mod, it's just how i've done it - and hopefully this will help others, even if they don't follow my way 100%. Brief overview: The general consensus is that from Factory, M35 Stageas limit throttle to 30% for up to 3 seconds after releasing the brake pedal. This can prevent good launches/coming out of corners faster. By cutting the signal wire to the ECU, we can maintain full throttle immediately after releasing the brake. It is OK to cut this wire, however you will get a Check Engine Light after some time. By rigging it up to a switch, you are able to disable/enable the mod freely. Behind the glovebox is the ECU. You will need to dissemble the passenger side interior to access this, there's other guides online on how to do this - so I will assume you have your glovebox out and are looking at the ECU. Pull the plastic off guard off the ECU connector, it clicks off the 4 tabs on each corner. Find the VIOLET wire with the BLUE stripe - you can see it in pictures 1 + 4 of this post. I cut this wire, and attached either side to a terminal block. You can pick these up from JayCar very cheaply - I used a terminal block because I don't trust myself to solder wires coming directly off the ECU. I then picked up a small, discrete ON/OFF toggle switch (also from JayCar), which I mounted in my Glovebox - see pictures 2 + 3. Lastly just attach these wires to the remaining spots on the terminal block. Test the switch while everything is apart - This way you can fix any problems before reassembling. Done! Picture 4 of this post explains the above if anyone is unclear. Some people have hooked this up to the reverse switch in the car, so they don't have to touch the switch ever - however I like the idea of a toggle, so I can limit throttle power when a family member/friend drives the car.
-
Hey All, I just wanted to do a write up for a tail light mod to make all the 4 rings light up on my R34. As stock (Mine at least) only the outer ring lights up, and i'm not a fan of this. (What mine looked like stock) So to do this you will need - 6x diodes (i just used some 3A rated jaycar ones) - Some heat shrink - Soldering gear To start you will need to remove the lights from the car. you need to remove the boot lining then you will find the 4 nuts that hold on the tail lights. Once these are out you will need to disconnect the connector then remove the assembly from the car. In my car i had this annoying sticky wrap on the cable. Removing this is a pain as it sticks to everything. Once this is removed you will want to wire in 3 diodes same as this diagram. I forgot to note down what colour the indicator light cable was. but this diagram should be correct (at least on a 98) it may be different on other years. After making this change on both sides when you press the brakes both sides should light up. If your interior lights come on when press the brakes you put in diode that goes between the 2 other diodes backwards. When you are all done it should look something light this when you press that brakes. I think it looks way better than stock. How legal is this? I don't know but i can imagine a cop pulling you over for having too many brake lights. I thought this was pretty straight forward to do but couldn't find any other write up's with exactly how to do it. Hope this helps for anyone that trying to do the same thing. Any questions let me know.
-
Hey Guys and Girls want your opinion on cold air intake for r33 i'm thinking of two options for cold air intake opinion one set up like this but if i set up like this i'm pretty sure it will be classified as an illegal mod or pod filter in an enclosed box and running a pipe underneath which do you reckon will be better
-
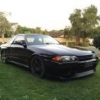
Okay so first off hello. I'd like to begin this Build buy giving you a little history, before this I owned a 99 Subaru Forester, which started fairly stock N/A manual. The motor blew In that so I bought a wrx sti halfcut and transplanted that, plus a whole lot more. I then Sold that an purchased myself a very rough N/A R32 RB20DE Neo Had some nice extras (Genuine Nardi, Factory Cupholders) I then got into my first car accident and destroyed it. The reason theres no "Before" shot of this beauty is because I did not have the time to take one before totalling the poor thing. But it wasn't all bad because I got a fairly generous insurance payout for it, and purchased my current vehicle. A 1992 R32 Gts-t, This originally was one of the few automatic rb25de r32's to come out but has been converted since. And so we begin the build. The day I got her (minus strut brace) - had some ugly sideskirts and wheels straight out of Need for Speed. But there were big plans ahead. First had to make a Pod box to hide the filter. Next up decided to remove the sound deadening from the backseats, and boot (as it already was missing boot interior why not go the whole 9 yards?) Next up was interior, as it was already in pretty good shape I decided to try and keep it fairly simple. Got myself a sparco steering wheel, sparco quick release, nrg short boss kit along with a sparco shifter. I also change the ugly green and white dash cluster back to the original grey with purple led's I did the aircon unit and rest of the din area while I was at it all in purple. Also picked up some gtr seats which needed some fixing for faily cheap so sewed them up and put them in, much better! Moving onto the exterior I had big plans, slowly starting to gather all of the bolt on bits and pieces I'd be adding. This included the following: n1 vents for the gtr front bar gtr grill gtr bonnet with n1 lip n1 sideskirts gtr overfenders trust rear pods dmax roof wing dmax boot wing Slowly but surely I got it all together and began trimming up the fibreglass pieces and text fitting them. Got myself some new pipes made up and got rid of the cannon, (To Be Continued)