


MrStabby
-
Posts
3,723 -
Joined
-
Last visited
-
Days Won
1 -
Feedback
100%
Content Type
Profiles
Forums
Events
Gallery
Media Demo
Store
Everything posted by MrStabby
-
Need more radiator I currently have a Cooling Pro Triple Core 40mm from Just Jap, but I need more cooling at the track. With respect to design, here's my current set of assumptions; - Number of rows does not make a huge difference - Number of passes probably makes more difference than number of rows - Thicker core should be better So I should probably get something with ~50mm core and two or more passes Options; Blitz Racing ZS 42mm, just jap, $600 or rhdjapan $399+delivery KOYO Copper Radiator Type-S, "Num. of Layers: 2" $436+delivery TRUST GREDDY TW-R 50mm, "2-Row" rhdjapan, $436+delivery HPI Radiator Evolve STD Series, 50mm, "Wide Tube 2 Core" rhdjapan $492+delivery KOYO Type F Aluminum, 48mm, "Num. of Layers: 2" $802+delivery HPI Multi Flow Evolve, 40mm, "Multi Pitch Core (Triple Turn)" $871+delivery Does "layers" mean cores or passes? Any recommendations from this list or elsewhere?
-
Yep, and check that you have the full ~14.5V (alternator charging) at the coils when you're hitting boost. IIRC another SAU'er had an alternator who's output was trailing off higher in the RPM band, so you'll want to log it, even if only at the ECU (cause logging at the coils probably wont be so easy).
-
How did you set the dwell? Or did you leave it stock? FWIW the coil power feed on the RB26 appears to be a dedicated, relay driven circuit. I'm hoping its ok to re-use when i do mine.
-
 Re: A pillar inner guard braces, worthwhile? These right (UR-FD3-188 in the link below) http://www.uniqueautosports.com.au/Parts-Shop/ultra-racing-front-strut-bar-and-fender-bars-588.aspx
 -
For direct fit on a 32 GTR he needs SF-DIS-001
-
Agreed, if the assumption that the lower joints can be considered pins, but they will have some resistance as they are not pinned. I guess I should correct myself and say that pinned strut bars are "not useless", rather than that they're "not completely dumb", because it is dumb to pin something that's better not pinned. I am assuming that the flexibility in the tower is non-linear, and that the preloading pulls the towers up to a point where stress vs strain is higher than when not preloaded.
-
They're not completely dumb, as long as they have a turnbuckle in the middle and they're tensioned up after the install. Pulling the upper arm mounts together makes them more rigid.
-
Howto - Install Gizzmo Klite knock sensor
MrStabby replied to MrStabby's topic in Tutorials / DIY / FAQ
I'd imagine anywhere on the block would do alright as the vibrations would have to be roughly equivalent all over, since its solid iron. The location of the OEM sensors is apparently the ideal spot, and given that there is already some trouble distinguishing knock noise from other noise using the best spot it probably worthwhile. -
Howto - Install Gizzmo Klite knock sensor
MrStabby replied to MrStabby's topic in Tutorials / DIY / FAQ
Doh its on my RB26. I've updated it to add the car. Mine seemed to be working after the calibration run. I see a little activity on one LED during normal running, which is what they say to expect, and i expect to see a lot more LEDs go nuts if i get some knock. -
I'm told there's no rebuild parts left for R32 compressors, so i'd avoid those. Custom brackets + hoses for the S15 air con not an option?
-
Very nice. Would be cool if you went to the track and got some mates to randomly add or remove the brace without telling you before each session, both of you keeping notes, then compare at the end to see if you can pick it. There's no escape from confirmation bias. But testing like that is too much work, so maybe just compare track times?
-
Some Quite Interesting, but unverified, tidbits; This ebay add says; Nissan OEM coil : 22 KV Split fire Coil: 24KV LS1 Coil : 30Kv LS2 Coil : 34Kv LS2 TRUCK (with alloy heat sink): 42kv, twice the firing power, GUARANTEE NO MISS FIRE 32PSI (2.2 BAR) @ 1.1MM GAP And this post on performanceforums says; so coil energy at max safe dwell before saturation begins is: Yaris @ 2ms/6A 78mj Toyota @ 3ms/6A 117mj D585 @ 8 amp dwell (UNSAFE) 256mj D585 @ 6 amp dwell (SAFE-ISH) 144mj
-
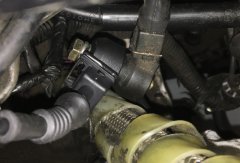
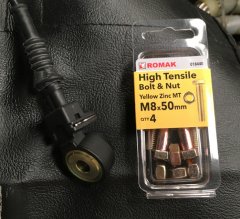
Howto - Install Gizzmo Klite knock sensor on an R32 GTR Since these kits are only ~$300 on ebay (i used seller "globalautoco"), I thought i'd give it a go. Required; K-Lite kit including knock sensor M8 x 50mm bolt (Bunnings has a set of 4 high tensiles for ~$5). Soldering iron, multimeter Usual socket set, torque wrench etc 1. Remove/move aside the rear part of the wheel arch lining from drivers side front wheel well 2. Push plug end of sensor lead into the drivers side foot well from the engine bay 3. Remove the interior trim under the steering column. Find a +12v source that is one when the engine is on (IGN) connect the red to that via an inline fuse and connect the green wire to earth 4. Connect sensor to gauge 5. Tie all the wiring away nicely 6. Remove the battery, plenum intake piping, dipstick etc to get some room to move under the plenum 7. Find the front factory knock sensor (underneath and to the left of the 2nd cylinder plenum runner, on the top of the block just below the head to block join. Remove the attaching bolt 8. Thread the 50mm bolt through the new sensor, then the factory sensor, then bolt it back onto the block. Torque to ~20Nm. The factory bolt has a 30mm shank, and the new sensor is 20mm high, hence the 50mm bolt. I used a spring washer 9. Re-install everything and mount the gauge 10. Start the car and bring car up to temp with normal driving 11. Find somewhere you can safely run the car at 3/4 throttle in 3rd or 4th gear. Dyno would be best 12. Initiate the calibration sequence by holding finger on the gauge directly under ZMO of the Gizzmo print for 3 seconds 13. Release finger and gizzmo will count down 6 seconds (which it shows on the LEDs, indicating its about to enter calibration mode) 14. Run engine at 3/4 load in 3rd or 4th gear from the start of the power band 15. Hold in this state as long as possible until klite has finished analysing. The two analysing steps are; 1. Search for your engine's noise profile. It displays a sequence of red leds then green leds as it analyses from high to low frequency and will stop the sequence once it has found it. 2. Sensitivity analysis during which the LEDs will very quickly flash through green to red. Once these steps are completed the klite will flash the 1 or 2 LEDs indicative of the set frequency, which confirms it has been set. If it fails to setup, it will revert back to the original settings and flash those settings for an extended period. 16. Drive. klite will climb as you come on power, if it detects knock it will flick up erratically. You can retrieve the peak reading by touching the klite for under 2 seconds
-
From the album: Parts
-
From the album: Parts
-
Oil going missing = air/oil separator time?
MrStabby replied to MrStabby's topic in Engines & Forced Induction
Tried it - no smoke. -
Oil going missing = air/oil separator time?
MrStabby replied to MrStabby's topic in Engines & Forced Induction
AFAIK black = fuel (rich), blue/white = oil. -
Oil going missing = air/oil separator time? I notice that when running the engine hard its now using some oil, but there's no smoke, and i cant see any oil leaks. I would have expected to see a little blue smoke if oil was getting consumed - can the engine be burning oil if there's no smoke? Should i get a catch can/air oil separator?
-
Symptoms of bad transfer case?
MrStabby replied to TXSquirrel's topic in Suspension, braking, tyres and drivetrain
It might be gearbox oil breathing - check the shifter to gearbox boot, which is under the shifter to body boot. -
Ok cool - ill try that.
-
Interesting, i started the polish with a kit that had cerium oxide and pads that you put on a drill, but the progress was so slow i gave up. What did you do? Did you get the deep scratches out with 400 10001500 2000 3000 sandpaper like in the ebay add?
-
Now that my car is reliable at the track, all i do is; - Keep an eye on pad material, and I like to have a spare new set as this allows me to use more of the pad before the change as I know if I did suddenly go all the way through, i can just put the new pads on. Brake fluid is bled regularly to keep the pedal feel. I never do a full flush as it cycles through quickly enough that i believe its not required. I have just done a full flush to change from Nulon to RBF600, as i want to avoid having to do any bleeding at the track. - Re oil, I run Mobil1 0W-40 or Nulon 10W-40, and change it at maybe 3-4000kms - I will get it tested next time to see how its holding up. I overfill to the bump on the dipstick, and check/top up every session. For gear oils, full synthetics should be ok to be run at 3x the change interval you'd use for minerals. I only use full synth, and last did the gearbox at about 20,000kms, but it has been topped up due to shockproof's tendency to breath. Diff oil has probably been there for about 30,000km. I need to pull it out to do the bushes so will do it again when i do that. For power steer, since boiling fluid can be an issue, again use full synth due to the higher boiling point. I guess double the change interval over what you'd use for mineral. I dont think i've changed the power steer fluid for quite some time, but its never boiled and gets topped up a bit due to a leak in the rack. - Coolant gets a really hard time, so do that every 10,000 and NEVER put any tap water in. IIRC a 6 liter green coolant pretty much fills it, so I dont think i add any water at all. Of course only distilled if required. Redline water wetter cools a little better than the usual stuff... - Plugs get done whenever there's any imperfect running... Platinums have been fine for at least 40,000kms and coppers 15,000kms, but depends on usage and tune. - I dont need to check for loose bolts anymore - just use the correct torque setting (and lube if specified) and they should never come loose unless there's a fundamental issue (eg AFAIK rb25 hot side can get loose in the long term). - Just use feel and tyre wear to determine if there's any alignment issues. Anyway - start with paranoia and check everything, and then once you know what stuff never goes bad, you can back off the checks that aren't required.
-
Question about chassis rails then; do they do fark all WRT chassis rigidity? AFAIK they're just shallow box sections running front to rear, so I cant see how they would provide much resistance to flex in any dimension compared to the contribution of the roof. And if that's true, then the defects you get from bashed up chassis rails is wankery...
-
The more power/torque you make the more difficult it is for the spark to jump across the plug gap. Missfire on boost is classic underpowered ignition. So you either need to add more electric power to the plugs, or make the gap shorter. Since closing the gap is free, its a good place to start for diagnosis. You can also inspect the plugs while they're out to see if they are consistently coloured, which should help diagnose if some coilpacks are weaker than others. Also check that the coils are seeing the full ~14.5V, because less volts on the primary solenoid means less volts at the secondary solenoid and therefore less volts at the plug.
-
Glass polishing I've got scuff marks on both door windows i'd like to get polished out. Does anyone have a recommendation for this work? Do car detailers usually do it?


